顯示具有 JavaScript 標籤的文章。 顯示所有文章

2025年2月9日 星期日

Firebase - Hosting 建立自己的簡易網站 By GitHub

各位大大想如果有網頁開發基礎( Html JavaScript Css )
但是不太懂要如何買伺服器去架設
那 Firebase Hosting 是你的好選擇
但是要注意會有容量限制請自行注意

為什麼要有 GItHub 的存在
因為 Firebase 部署上去
無法把所有的資源下載檔案( 壓縮檔 )下來
除非自己線上一個一個抓
所以過了一段時間自己電腦程式碼遺失就容易造成無法挽回悲劇

前置準備

  • 本地端要有 Node、Firebase-Tool 工作環境
  • Firebase 帳號
  • Github 帳號
操作步驟

  1. Firebase 建立( 新 )專案( hosting-deploy-by-github )


  2. Github 建立 Firebase 對應的專案 Repository( hosting-deploy-by-github )


  3. 從 Github Clone Repostory 到本地端


  4. 開啟命令提示字元

  5. 登入 Firebase
    PS: 要先登出的原因在於避免暫存影響到後續操作
    firebase logout
    firebase login
    firebase init

  6. 選擇建立好的專案項目


  7. 是否建立對外公用資料夾及是否建立首頁


  8. 是否使用 GitHub 設定自動建置和部署?


  9. 輸入對應的 Repository 名稱 ( AAA/hosting-deploy-by-github )


  10. 啟動工作時候是否要執行 Script? No( 常用於 Vue、Angular 等專案前置作業)


  11. 是否設定提出 PR 合併後自動部署並確認對應分支名稱
    PS: 此分支是直接上正式環境,如要模擬請開分支於本機驗證


  12. 最後只要對此 Github Reporsitory 進行操作的部署即可
    PS: 必須對應到您設定的監聽分支為主
    git add .
    git commit
    git push

  13. 登入 Github Action 確認分支完成後狀態是否為綠色打勾


  14. 登入 Firebase Hosting 建立網站網址內容是否已經更新,如果有就代表成功囉


PS: 設定 firebase.json
參考資源:

歡迎轉載,請註明出處。

2024年7月6日 星期六

Java - 程式碼排版的好處

目的

隨著開逐漸頻繁,我們就會產生非常多的程式碼內容,之後要如何將程式碼做有效的留存?如何要轉交給下一位同仁時能夠更快能夠更快上手。

爲什麼要排版

提高可讀性

清晰的程式碼結構和一致的格式可以讓程式碼更容易理解。良好的排版使得程式碼邏輯一目了然,減少理解程式碼的時間和精力。

減少錯誤

良好的排版有助於發現和避免錯誤。整潔的程式碼可以讓潛在的錯誤更容易被發現,例如缺失的括號或錯誤的縮排。

便於合作

在團隊合作中,一致的程式碼風格能夠讓團隊成員更容易閱讀和理解彼此的程式碼,減少溝通成本和程式碼衝突。

提高維護

程式碼在維護過程中需要頻繁地被閱讀和修改。良好的排版可以使得維護人員更容易理解程式碼邏輯,從而提高維護效率。


實際範例

修改前

public class Example {
public static void main(String[] args) {
int a = 10;
int b = 20;

if (a > b) {
System.out.println("a is greater");
} else {
System.out.println("b is greater");
}
}
}

修改後

public class Example {
    public static void main(String[] args) {
        int a = 10;
        int b = 20;
        
        if (a > b) {
            System.out.println("a is greater");
        } else {
            System.out.println("b is greater");
        }
    }
}

歡迎轉載,請註明出處。

2017年7月18日 星期二

Html-CheckBox 多選選單操作

我們要如何製作一個簡單的單選選單?
要如何取到選單對應的參數?
此篇文章會提到如何使用 JS (JavaScript), JQ (JQuery)


A
B
C
<form>
    <input type="checkbox" name="vehicle" value="0">A<br>
    <input type="checkbox" name="vehicle" value="1">B<br>
    <input type="checkbox" name="vehicle" value="2">C<br>
</form>

如何取出 select radioBox value ?

var valuelist = ''; 

$('input[name="vehicle"]:checked').each(function() {
    valuelist += this.value + ',';
});

Html-RadioBox 單選選單操作

我們要如何製作一個簡單的單選選單?
要如何取到選單對應的參數?
此篇文章會提到如何使用 JS (JavaScript), JQ (JQuery)

Male
Female
Other
<form>
      <input type="radio" name="gender" value="male" checked> Male<br>
      <input type="radio" name="gender" value="female"> Female<br>
      <input type="radio" name="gender" value="other"> Other
</form>

如何取出 select radioBox value ?

var radioVar = $('input[name=gender]:checked').val();

Html-Option 下拉選單操作

我們要如何製作一個簡單的下拉選單?
要如何取到選單對應的參數?文字?
此篇文章會提到如何使用 JS (JavaScript), JQ (JQuery)

以下是範例 :


<select id="selectId" onchange="changeOption();">
  <option value="0">請選擇</option>
  <option value="1">a</option>
  <option value="2">b</option>
  <option value="3">c</option>
  <option value="4">d</option>
</select>

如何取出 select option value ?

var optionVar = $('#selectId').val();

如何取出 select option text ?

var optionText = $('#selectId option:selected').text();

如何設置被選擇的參數 ?
$("#selectId").val("2").change();


2017年7月12日 星期三

JavaScript-客製化日期選單

// 年度
var date = new Date();
var minYear = 1940,maxMonth = date.getFullYear(),
    selectYear = document.getElementById('selectYear');

for (var i = minYear; i<=maxMonth; i++){
    var opt = document.createElement('option');
    opt.value = i;
    opt.innerHTML = i;
    selectYear.appendChild(opt);
}

// 月份
var minMonth = 1,maxMonth = 12,
    selectMonth = document.getElementById('selectMonth');

for (var i = minMonth; i<=maxMonth; i++){
    var opt = document.createElement('option');
    opt.value = i;
    opt.innerHTML = i;
    selectMonth.appendChild(opt);
}

// 預設日期
daysInThisMonth();

// 日期
function daysInThisMonth() {
  var date_var = new Date(date.getFullYear(), date.getMonth()+1, 0).getDate();
  var minDay = 1,maxDay = date_var,
      selectDay = document.getElementById('selectDay');
    selectDay.options.length = 0;
  for (var i = minDay; i<=maxDay; i++){
      var opt = document.createElement('option');
      opt.value = i;
      opt.innerHTML = i;
      if(i == 1){
      opt.selected = "true";
      }
     
      selectDay.appendChild(opt);
  }
}
 

2017年5月1日 星期一

Website-FireBase Hosting 靜態網頁部屬


此篇會從如何安裝、連結、部屬專案開始

會寫此篇的目的在於因為網路資訊過多
想整理出自己較能理解的版本
官方文件說明 : 連結

步驟概要
- 下載 Node.js
- 用 npm 串接 FireBase
- 將專案部屬到 FireBase

1 . 下載 Node js : 連結


2 .開啟命令提示字元,確認 NPM 是否確實安裝
npm -version


3 . 安裝相關套件,以便於後續使用
npm install -g firebase-tools


4 . 新增專案檔案夾
並且要有 public
還有 index.html( 放置在 public 底下 )


6 . 命令提示字元指向此路徑
cd C:\Users\BluePC\Desktop\Test\public ( 建議用複製 )

4 . 執行 FireBase ,並且執行程序
firebase init ( 不用加 npm  )


這邊可能會出現需要權限的需求,所以必須串接你的帳號


輸入 Login 指令,成功後再次執行 firebase init
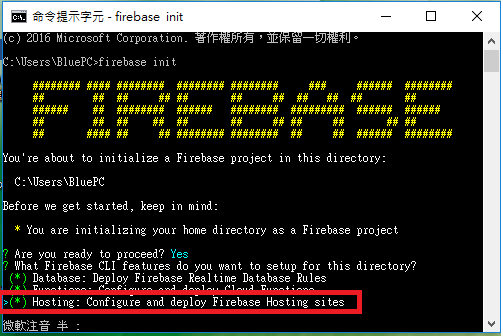
firebase login


5 .選擇 Hosting 選項


6 . 選擇 Firebase 底下的指定專案


7 .


參考資料 : Firebase Hosting 靜態網站部署試用
參考資料 : Firebase 架站
參考資料 : Get Started with Hosting

Mac
參考資料:Firebase Hosting 靜態網站部署
參考資料:https://andy6804tw.github.io/2017/12/14/npm-tutorial/
參考資料:【備忘録】npm -g install に失敗する

歡迎轉載,請註明出處。

2017年2月20日 星期一

JavaScript-常用方法

項目
1 . 頁面初始化
2 . 取得對應標籤參數
3 . 點擊事件
4 . Form 傳送資料,另一頁面接收( Jsp、Struts2 )

頁面初始化
<%@ page language="java" contentType="text/html; charset=UTF-8"
    pageEncoding="UTF-8"%>
<!DOCTYPE html PUBLIC "-//W3C//DTD HTML 4.01 Transitional//EN" "http://www.w3.org/TR/html4/loose.dtd">
<html>
<head>
<meta http-equiv="Content-Type" content="text/html; charset=UTF-8">
<title>Insert title here</title>
</head>
<script
    src="https://ajax.googleapis.com/ajax/libs/jquery/3.1.1/jquery.min.js"></script>
<script>
    $(document).ready(function() {
        
    });
</script>
<body>

</body>
</html>

取得對應標籤參數
<script>
    .
    var age = document.getElementById("editText").value;
    .
</script>
<body>
    .
    <input type="text" id="editText" value="" />
    .
</body>


點擊事件
<script>
    function myFunction() {
        .
        .
        .
    }
</script>
<body>
    <input type="button" id="btn" value="送出" onclick="myFunction()" />
</body>
</html>

Form 傳送資料,另一頁面接收( Jsp、Struts2 )
參考資料:How to pass the values from one jsp page to another jsp without submit button?
a.jsp
<form action="hello_4" method="post">
    <input type="text" name="name">
    <input type="submit" name="send">
</form>

b.jsp
<body>
    <% String name=request.getParameter("name"); out.print("Hello:"+name); %>
</body>


JavaScript-檢查 Form 內部元件是否為空

check form is null
參考資料:JS form check empty

2017年2月18日 星期六

JQuery-遇到的問題彙整

身分證
http://liaosankai.pixnet.net/blog/post/24165900-%E8%BA%AB%E4%BB%BD%E8%AD%89%E9%A9%97%E8%AD%89%E7%A8%8B%E5%BC%8F-for-javascript-(%E7%B2%BE%E7%B0%A1%E7%89%88)

checkbox radio 參數 (name : Jaskaran singh Rajal)
http://stackoverflow.com/questions/2834350/get-checkbox-value-in-jquery

Two listBox
http://esausilva.com/2016/01/29/move-items-between-two-listbox-using-jquery-html-select-tag/

日期元件
https://www.w3schools.com/jsref/tryit.asp?filename=tryjsref_input_date_value2
日期檢查
http://www.jquerybyexample.net/2011/10/validate-date-format-using-jquery.html

2016年10月31日 星期一

Website-FireBase 的前置作業

Google 的 FireBase 不僅提供行動裝置的服務
也提供在網頁端的服務
讓我們在開發上又省了許多麻煩事

這篇帶來的是如何在網頁上添加 FireBase基本參數
1 . 切換到專案管理


2 . 新增項目為 ?


3 . 生成對應參數,並且將參數複製


將剛剛複製出來的參數寫入程式碼內
<!DOCTYPE HTML>
<script src="https://www.gstatic.com/firebasejs/3.5.2/firebase.js"></script>
<html> 
  <script>
    // Initialize Firebase
    // 請自行更改下方的參數
    var config = {
      apiKey: "aaaaaaaaaaaaaaaaaaaaaaaaaa",
      authDomain: "bbbbbbbbbbbbbbbbbbbbbbbbbbbbb",
      databaseURL: "ccccccccccccccccccccccccccccc",
      storageBucket: "dddddddddddddddddddddddd",
      messagingSenderId: "eeeeeeeeeeeeeeeeeeee"
    };
    firebase.initializeApp(config);
    
  </script>
  <head>
    <meta http-equiv="Content-Type" content="text/html; charset=utf-8" />
    <title>標題</title>
  </head>
  <body>
    Hello World
    
  </body>
</html>

參考資料 : Add Firebase to your JavaScript Project
歡迎轉載,請註明出處。

2015年1月10日 星期六

JavaScript-字串處理

如果是字串型別,請務必在參數加入雙引號
var str = "我的外框是雙引號" ;

方法 用途
str.length; 字串長度
str.toUpperCase(); 內容改為大寫
str.toLowerCase(); 內容改為小寫
str.charAt(2) 取得某位置內的字元
str.indexOf("a"); 取得某字元上的位置
str.indexOf("a",7); 取得某位置後的某至字元位置
str.split(""); 字元分割( 每個 )
str.split("-"); 字元分割( 參數 )
str.split("-",3); 字元分割,取相對組數
str.substring(5); 取得某位置後所有的參數
str.substring(5,10); 取得某位置之後相對的所有參數
str.substr(5,3); 取得某位置到某位置之間參數


JavaScript-日期 / 時間

注意 : 不同的瀏覽器有不同的時間格式
定義時間對象,Date必須大寫
var date = new Date( );
vat date_0 = new Date(2012, 10, 1);

方法名稱 功能
get/setDate() 取得/設置日期
get/setFullYear() 取得/設置( 西元 )
get/setYear() 取得/設置( 民國 )
get/setMonth() 取得/設置
1~12
get/setDay() 取得/設置
get/setHours() 取得/設置
0~24
get/setMinutes() 取得/設置
1~60
get/setSeconds() 取得/設置
1~60
set/getTime() 取得/設置
Sat Jan 10 2015 17:04:55 GMT+0800 (台北標準時間)


星期處理 :
var weekday=["星期日","星期一","星期二","星期三","星期四","星期五","星期六"];

延遲時間2小時 :
 mydate.setTime( mydate.getTime()  + 2* 60 * 60 * 1000);


JavaScript-基本事件


事件 內容部份2
onclick 滑鼠點擊
onmouseover 滑鼠經過範圍
onmouseout 滑鼠移開範圍
onchange 內容被更變
onselect 內容被框選
onfocus 光標聚集 ( 輸入帳號密碼文字框提醒 )
onblur 光標離開
onload 載入網頁
onnuload 關閉網頁


以下是修改事件監聽名稱 :

<form>
    <input name="hello" type="button" value="hello" onclick="openwin()"/>
</form>

2014年12月30日 星期二

JavaScript-基本 用法

Java 不等於 JavaScript !

1 . 需要的工具 ?
您可以下載 Notepad++ 來編寫。

2 . Html vs JavaScript vs jQuery 關係?
一) JavaScript 最主要讓您的網頁更活,不會死板板的
二) 通常一個JavaScript Function  會對應一個 Html 的原件
三) JQuery 是以 JavaScript基底
四) JQuery 可以看成工具包 ( 效果、事件...等 ) 都已經寫在裡面
三) Script可放在html任何位置內, 但Head 和 body 不要間斷,都是可以使用的。
      但一般常用於Head 或 Body 內

3 . 如何開始 ?
一) 開啟 Notepad++
二) 將以下的程式碼貼在編輯區域內
三) 儲存檔案的副檔名為 : XXX.html
四) 點擊生成的檔案即可觀看成果

<!DOCTYPE HTML>
<html> 
<head>
<meta http-equiv="Content-Type" content="text/html; charset=utf-8" />
<title>熱身</title>
</head>
<body>
  <p id="p1">大家好</p>
  
  <script type="text/javascript">
    document.write("hello");
    document.getElementById("p1").style.color="red";
  </script>
</body>
</html>


<script type="text/javascript">
         document.write("hello");
</script>

hello

<p id="p1">大家好</p>

<script type="text/javascript">
         document.getElement("p1").style.color="red";
</script>

大家好
script.js
document.write("hello");

Main.html
<script src="script.js">
</script>
hello
<script type="text/javascript">
         var a = "hello";
         document.write(a);
</script>
hello
<script type="text/javascript">
         function aaa(){
                var a = "hello";
                document.write(a);
          }
</script>

<script type="text/javascript">
         function aaa(){
                var a = "hello";
                alert(a);
          }
</script>
跳出提醒視窗( hello )
<script type="text/javascript">
         function aaa(){
                var a = confirm("你是帥哥嗎?");
                if(a == true){
                      document.write("真的 !!!");
                 } else{
                      document.write("要有自信!!!");
                }
          }
</script>
<input name="button" type="button" onClick="rec()"
                       value="請點我" />
點擊後會觸發aaa對話視窗
會有Yes、No選項

<script type="text/javascript">
  function rec(){
var score = prompt("請輸入您的成績 :",60) ;
if(score>=90) {
  document.write("棒!");
} else if(score>=75) {
  document.write("不錯!");
} else if(score>=60) {
  document.write("要加油!");
 } else {
       document.write("要努力了!");
}
  }
</script>
<input name="button" type="button"
onClick="rec()" value="點擊我!" />
輸入參數視窗( 60 是預設參數 )
<script type="text/javascript">
  function openWindow(){
      window.open('http://www.yahoo.com.tw');
  }
</script>
開啟新的頁面
<script type="text/javascript">
window.open('http://www.yahoo.com.tw','_blank',
'width=500,height=500,menubar=no,toolbar=no, status=no,scrollbars=yes')
</script>

空格一 :
URL

空格二 :
開啟視窗的型態
_top : 當前頁面
_blank : 新視窗
_selft : 在同頁面開啟新視窗

空格三 :

toolbar(Yes | No) : 工具列是否顯示
scrollbars(Yes | No) : 是否使用滾動卷軸
resizeable(Yes | No ) : 使用者是否可以調整視窗
location(Yes | No ) : 是否顯示網址
menubar(Yes | No) : 是否顯示目錄
status(Yes | No ) : 是否顯示狀態列
left(pixels) : 距離左邊距離
top(pixels) : 距離上方距離

開啟新的頁面
附帶條件
<script type="text/javascript">
     var mywin=window.open("http://www.yahoo.com.tw");
     mywin.close();
</script>
關閉視窗
document.getElementById("id");

<p id="s">JavaScript</p>
<script type="text/javascript">
  var str=  document.getElementById("s");
</script>

藉由ID獲取相關元素
Object.innerHTML( 大小寫有區分 )

<h2 id="s">javascript</H2>
<script type="text/javascript">
  var str= document.getElementById("s").innerHTML;
  document.write("Output : "+str.innerHTML+"<br>");
</script>

用來存/取HTML裡的元素

Output : javascript
Object.style.property

<p id="pcon">Hello World!</p>
<script>
   var mychar = document.getElementById("pcon");
   mychar.style.color="red";
   mychar.style.fontSize="20";
   mychar.style.backgroundColor ="blue";
</script>
更改HTML樣式

<style>
    body{ font-size:16px;}
    .one{
border:1px solid #eee;
width:230px;
height:50px;
background:#ccc;
color:red;
    }
    .two{
border:1px solid #ccc;
width:230px;
height:50px;
background:#9CF;
color:blue;
    }
</style>

<script type="text/javascript">
     function add(){
           var p1 = document.getElementById("p1");
           p1.className = "one";
     }
     function modify(){
           var p2 = document.getElementById("p2");
           p2.className =  "two";
     }
</script>


您好
你也好

<!DOCTYPE HTML>
<html>
<head>
<meta http-equiv="Content-Type" Content="text/html; charset=utf-8" />
<title>javascript</title>
<style type="text/css">
body{font-size:12px;}
#txt{
    height:400px;
    width:600px;
border:#333 solid 1px;
padding:5px;}
p{
line-height:18px;
text-indent:2em;}
</style>
</head>
<body>
  <h2 id="con">JavaScript课程</H2>
  <div id="txt">
     <h5>JavaScript为网页添加动态效果并实现与用户交互的功能。</h5>
        <p>1. JavaScript入门篇,让不懂JS的你,快速了解JS。</p>
        <p>2. JavaScript进阶篇,让你掌握JS的基础语法、函数、数组、事件、内置对象、BOM浏览器、DOM操作。</p>
        <p>3. 学完以上两门基础课后,在深入学习JavaScript的变量作用域、事件、对象、运动、cookie、正则表达式、ajax等课程。</p>
  </div>
  <form>
    <!--当点击相应按钮,执行相应操作,为按钮添加相应事件-->
    <input type="button" value="改变颜色" onClick="changeColor()">
    <input type="button" value="改变宽高" onClick="changeWidthHigh()">
    <input type="button" value="隐藏内容" onClick="changeDisplay()">
    <input type="button" value="显示内容" onClick="changeDisplayBlock()">
    <input type="button" value="取消设置" onClick="changeReset()">
  </form>
  <script type="text/javascript">
    //定义"改变颜色"的函数
    function changeColor(){
        var color = document.getElementById("txt");
        color.style.color = "blue";
    }
    //定义"改变宽高"的函数
    function changeWidthHigh(){
        var color = document.getElementById("txt");
        color.style.width = "200px";
        color.style.height = "200px";
    }

    //定义"隐藏内容"的函数
    function changeDisplayNone(){
        var color = document.getElementById("txt");
        color.style.display = "none";
    }

    //定义"显示内容"的函数
    function changeDisplayBlock(){
        var color = document.getElementById("txt");
        color.style.display = "block";
    }

    //定义"取消设置"的函数
    function changReset(){
        var color = document.getElementById("txt");
        color.removeAttribute("style");
    }
  </script>
</body>
</html>
這是在練習DEMO所留下來
var a=document.getElementById("txt1").value;
document.getElementById("fruit").value=d;
取得文字框內容
對元件設定參數
45
12
45


參考資料 : 重新介紹 JavaScript