層次問題
參考資料 : Java Swing - how to show a panel on top of another panel?
文字如何置中
參考資料 : Centering a JLabel on a JPanel
2016年5月31日 星期二

2016年5月28日 星期六
JavaSwing-入門、基本說明( 一 )
Java Swing 簡單的說是把 Java 的程式用圖形化輸入、顯示
以一般使用者來說 : 以下 2 張圖哪一張比較計算功能較直覺?
題目 : 2 + 3 = 5
1 . 命令提示視窗

2 . GUI ( 圖形化介面 )

就一般使用者來說, GUI 淺顯易懂
若使用命令提示字元,想必等級一定不低吧...
工作環境請參照 : Android-1-Eclipse環境設定 X 3
如果沒有任何程式開發經驗者
可以先想像 : 我們畫一張圖畫,則需要那些用具??
Model、畫筆、紙
對,我們就是先要一張紙
您可以先把 JFrame 想像成一張紙
JFrame 就是我們整個 UI 的基底
我們先來測試吧
首先,新增一個 Class
以下就是我們的第一個範例 :

參考資料 : Java 入門指南 - GUI 的基本概念
參考資料 : 深入淺出 Java
參考資料 : JavaSwing 頭到尾
歡迎轉載,請註明出處。
以一般使用者來說 : 以下 2 張圖哪一張比較計算功能較直覺?
題目 : 2 + 3 = 5
1 . 命令提示視窗

2 . GUI ( 圖形化介面 )

就一般使用者來說, GUI 淺顯易懂
若使用命令提示字元,想必等級一定不低吧...
工作環境請參照 : Android-1-Eclipse環境設定 X 3
如果沒有任何程式開發經驗者
可以先想像 : 我們畫一張圖畫,則需要那些用具??
Model、畫筆、紙
對,我們就是先要一張紙
您可以先把 JFrame 想像成一張紙
JFrame 就是我們整個 UI 的基底
我們先來測試吧
首先,新增一個 Class
import javax.swing.JFrame;

public class FirstPage {

    private JFrame jFrame;

    public FirstPage() {
        jFrame = new JFrame();
        // 視窗大小
        jFrame.setSize(600, 600);
        // 視窗標題
        jFrame.setTitle("FirstTitle");
        // 定義關閉視窗後的動作 ( 結束內部程式運作 )
        jFrame.setDefaultCloseOperation(JFrame.EXIT_ON_CLOSE);
        // 是否顯示視窗
        jFrame.setVisible(true);
    }

    public static void main(String[] arg) {
        FirstPage firstPage = new FirstPage();
    }
}
以下就是我們的第一個範例 :

參考資料 : Java 入門指南 - GUI 的基本概念
參考資料 : 深入淺出 Java
參考資料 : JavaSwing 頭到尾
歡迎轉載,請註明出處。
2016年5月26日 星期四
2016年5月19日 星期四
Maven-在 Eclipse 創立 Maven 專案_lib ( 四 )
2016年5月18日 星期三
Maven-在 Eclipse 創立 Maven 專案_執行 Jar ( 三 )
上一篇 : Maven-在 Eclipse 創立 Maven 專案_Hello Maven( 二 )
用 Maven build 生成的 Jar 我們執行看看會發生什麼事情?
在我們剛剛訊息列裡面
1 . 生成的 Jar 擺放位置

2 . 不想看的結果
原因 : 因為無法辨別主要的進入點

3 . 我們在專案內的 pom 新增
4 . 我們再重新建立

5 . 重新執行

參考資料 : Eclipse Blue, Maven: Project configuration is not up-to-date with pom.xml
歡迎轉載,請註明出處。
用 Maven build 生成的 Jar 我們執行看看會發生什麼事情?
在我們剛剛訊息列裡面
1 . 生成的 Jar 擺放位置

2 . 不想看的結果
原因 : 因為無法辨別主要的進入點

3 . 我們在專案內的 pom 新增
<build>
    <plugins>

        <!-- environment problem -->
        <plugin>
            <artifactId>maven-compiler-plugin</artifactId>
            <version>3.1</version>
            <configuration>
                <fork>true</fork>
                <executable>C:\JAVA\jdk\bin\javac.exe</executable>
            </configuration>
        </plugin>

        <!--
        打包成 Jar 檔案
        目的 :
        必須給進入點,否則執行會出現
        XXX.jar 中沒有主要資訊清單屬性
          -->
        <plugin>
            <groupId>org.apache.maven.plugins</groupId>
            <artifactId>maven-jar-plugin</artifactId>
            <version>2.3.1</version>
            <configuration>
                <archive>
                    <manifest>
                        <mainClass>first.Hello</mainClass>
                        <packageName>first</packageName>
                    </manifest>
                    <manifestEntries>
                        <mode>development</mode>
                        <url>${pom.url}</url>
                    </manifestEntries>
                </archive>
            </configuration>
        </plugin>

    </plugins>
</build>
4 . 我們再重新建立

5 . 重新執行

參考資料 : Eclipse Blue, Maven: Project configuration is not up-to-date with pom.xml
歡迎轉載,請註明出處。
Maven-在 Eclipse 創立 Maven 專案_Hello Maven( 二 )
上一章 : Maven-在 Eclipse 創立 Maven 專案_環境安裝( 一 )
開始執行程式
1 . 創立 Maven 專案
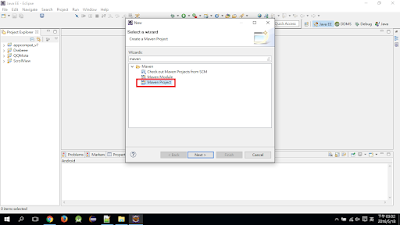
2 . 選擇專案樣板

3 . 輸入專案相關資料

4 . 專案創立後雖然長很多子項目,但結果如黃框

5 . 建立檔案夾目錄

6 . 建立 Main Class

7 . 測試結果可執行

8 . 使用 Maven build

9 . 建立

10 . Build maven error

解法
1 . 更新當前的 Jre
2 . 在 Maven 專案內的 pom 新增plugin
( work for me )

11 . 再次執行

參考資料 : Maven 教學-HelloMaven 第一個Maven專案 (Step by Step ~)
歡迎轉載,請註明出處。
開始執行程式
1 . 創立 Maven 專案

2 . 選擇專案樣板

3 . 輸入專案相關資料

4 . 專案創立後雖然長很多子項目,但結果如黃框

5 . 建立檔案夾目錄

6 . 建立 Main Class

7 . 測試結果可執行

8 . 使用 Maven build

9 . 建立

10 . Build maven error
[ERROR] Failed to execute goal org.apache.maven.plugins:maven-compiler-plugin:3.1:compile (default-compile) on project Brian: Compilation failure
[ERROR] No compiler is provided in this environment. Perhaps you are running on a JRE rather than a JDK?
[ERROR] -> [Help 1]
[ERROR]
[ERROR] To see the full stack trace of the errors, re-run Maven with the -e switch.
[ERROR] Re-run Maven using the -X switch to enable full debug logging.
[ERROR]
[ERROR] For more information about the errors and possible solutions, please read the following articles:
[ERROR] [Help 1] http://cwiki.apache.org/confluence/display/MAVEN/MojoFailureException

解法
1 . 更新當前的 Jre
2 . 在 Maven 專案內的 pom 新增plugin
( work for me )
</project ...>

    .
    .
    .

    <build>
        <plugins>
            <plugin>
                <artifactId>maven-compiler-plugin</artifactId>
                <version>3.1</version>
                <configuration>
                    <fork>true</fork>
                    <executable>C:\JAVA\jdk\bin\javac.exe</executable>
                </configuration>
            </plugin>
        </plugins>
    </build>
</project>

11 . 再次執行

參考資料 : Maven 教學-HelloMaven 第一個Maven專案 (Step by Step ~)
歡迎轉載,請註明出處。
訂閱:
文章 (Atom)